- Amaryllis Lovers
A Glorious Gift Ready To Grow & Bloom!
-
Living
Gifts
-
- SHOP BY TYPE
- Bulb Gardens
- Garden Clubs
-
- CUSTOMER FAVORITES!
-
- Gifts
-
- SHOP BY OCCASION
- Easter
- Mother's Day
- Valentine's Day
- Gift Exchange
- Birthday
-
- SHOP BY RECIPIENT
- Gardener
- Home Decorator
- Families
- Bird Lovers
- Teacher
- Business
- Nature Lovers
- Hostess
- Book Lovers
-
- GIFT CERTIFICATES

Truly Unique and Nature Inspired!
-
- Décor
-
- SHOP BY TYPE
- Home Décor
- Outdoor Décor
- Autumn Décor
- Lighting
-
- CUSTOMER FAVORITES!
-
- Food
- Sale
 Help
Help
- Amaryllis Lovers
A Glorious Gift Ready To Grow & Bloom!
-
Living
Gifts
-
- SHOP BY TYPE
- Bulb Gardens
- Garden Clubs
-
- CUSTOMER FAVORITES!
-
- Gifts
-
- SHOP BY OCCASION
- Easter
- Mother's Day
- Valentine's Day
- Gift Exchange
- Birthday
-
- SHOP BY RECIPIENT
- Gardener
- Home Decorator
- Families
- Bird Lovers
- Teacher
- Business
- Nature Lovers
- Hostess
- Book Lovers
-
- GIFT CERTIFICATES
Truly Unique and Nature Inspired!
-
- Décor
-
- SHOP BY TYPE
- Home Décor
- Outdoor Décor
- Autumn Décor
- Lighting
-
- CUSTOMER FAVORITES!
-
- Food
- Sale
How to Grow Amaryllis
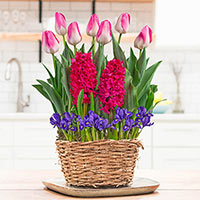
Looks, easy of growing and maintenance are parameters that play a major role in the selection of garden plants. Amaryllis is one of those wonderful plants that score prolifically on all these accounts! Amaryllis plants, with their large, vibrant blooms are perfect for adding appeal to your yard or even in a container during those cold winter months.
The first fun step is to pick out your bloom. Amaryllis come in many different shapes and colors. Pick a color that you enjoy the most and then grab your potting soil.
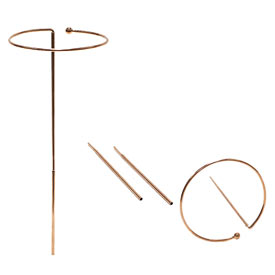
Now wait for the show to begin! But be patient as your bulb accommodates to its new home. It can take weeks for your bulb to sprout. Do not give up early! Some varieties can take longer than others. Typically, you will see a green sprout within two weeks. Once your amaryllis bulb starts to grow it will grow rapidly! Amaryllis bulbs can grow up to an inch a day. It is best to use an amaryllis stake to your pot to keep the stem from falling over. Take photos each day to watch its amazing progress! Are you wondering what to do with the amaryllis after it blooms? You can keep it indoors until Spring. You can plant or keep in a pot in the spring but in order to get it to rebloom, you must allow to go dormant. Many people question how to store amaryllis bulbs. The trick is to store in a basement or cool cellar around 50 degrees in late summer/early fall. Around October bring it back to your warm home and wait for new growth to start.
Growing Amaryllis Outdoors
Amaryllis bulbs do well in both sunny and partly shaded locations. They're an automatic choice for underlining tall deciduous shrubs and trees. A few days from planting, clear the site and add plenty of organic matter to the soil. The planting hole should be big enough to accommodate the root ball. Make sure the roots spread out as you lower the plant into the hole. Also, ensure that the top of the crown lies at the same level as the soil surface. Refill and irrigate thoroughly. During the next couple of weeks, water just enough to keep the soil moist as too much moisture can cause the rots to rot. Once the plants develop a couple of pairs of leaves, switch to irrigating them on a regular basis. Taller varieties of amaryllis can stoop under the weight of the flowers and hence require staking. Use a sturdy wooden pole to stake amaryllis plants and use a piece of string or twine to tie them the stem to the stake in 3-4 separate spots. Amaryllis plants relish regular fertilization. Use a well balanced fertilizer to feed your plants. Remove amaryllis flowers as they die, along with all faded leaves. As temperatures dip, stop irrigating your plants. The foliage will soon dry out and die. But there's no need to panic for winters are the resting period for these lovely plants. Once the cold season bids adieu, amaryllis plants will be back to enthral your senses!
6 Steps to Growing Amaryllis Indoors:
The first fun step is to pick out your bloom. Amaryllis come in many different shapes and colors. Pick a color that you enjoy the most and then grab your potting soil.
- Find a container the size between 6" - 8"
- Fill pot to almost full leaving 1/4 of the dirt out of the pot
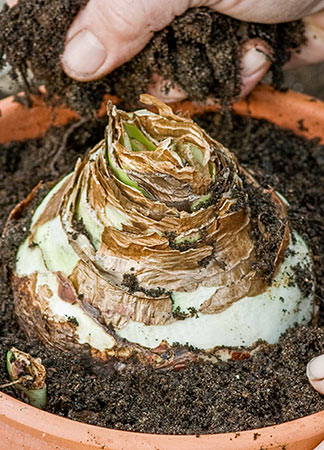
- Next add your amaryllis bulb pointed end up
- Add remaining soil but leave the top of your amaryllis uncovered at soil level
- Water only when you start to see growth but sparingly
- Now add your container next to a window or near indirect sunlight
Now wait for the show to begin! But be patient as your bulb accommodates to its new home. It can take weeks for your bulb to sprout. Do not give up early! Some varieties can take longer than others. Typically, you will see a green sprout within two weeks. Once your amaryllis bulb starts to grow it will grow rapidly! Amaryllis bulbs can grow up to an inch a day. It is best to use an amaryllis stake to your pot to keep the stem from falling over. Take photos each day to watch its amazing progress! Are you wondering what to do with the amaryllis after it blooms? You can keep it indoors until Spring. You can plant or keep in a pot in the spring but in order to get it to rebloom, you must allow to go dormant. Many people question how to store amaryllis bulbs. The trick is to store in a basement or cool cellar around 50 degrees in late summer/early fall. Around October bring it back to your warm home and wait for new growth to start.
Growing Amaryllis Outdoors
Amaryllis bulbs do well in both sunny and partly shaded locations. They're an automatic choice for underlining tall deciduous shrubs and trees. A few days from planting, clear the site and add plenty of organic matter to the soil. The planting hole should be big enough to accommodate the root ball. Make sure the roots spread out as you lower the plant into the hole. Also, ensure that the top of the crown lies at the same level as the soil surface. Refill and irrigate thoroughly. During the next couple of weeks, water just enough to keep the soil moist as too much moisture can cause the rots to rot. Once the plants develop a couple of pairs of leaves, switch to irrigating them on a regular basis. Taller varieties of amaryllis can stoop under the weight of the flowers and hence require staking. Use a sturdy wooden pole to stake amaryllis plants and use a piece of string or twine to tie them the stem to the stake in 3-4 separate spots. Amaryllis plants relish regular fertilization. Use a well balanced fertilizer to feed your plants. Remove amaryllis flowers as they die, along with all faded leaves. As temperatures dip, stop irrigating your plants. The foliage will soon dry out and die. But there's no need to panic for winters are the resting period for these lovely plants. Once the cold season bids adieu, amaryllis plants will be back to enthral your senses!
Have another question? Return to the Customer Service Help page or send an e-mail directly to Customer Service
-
Helpful Products from Gardens Alive!
-
Stackable Amaryllis Stakes